
A micro teaching lesson plan is a tightly focused blueprint for a short teaching session, usually just 5-15 minutes long. Its whole purpose is to help you practise and master one specific teaching skill at a time.
Think of it as isolating a single instructional muscle. Instead of trying to fix everything at once, you focus on one technique, practise it, get feedback, and repeat. It’s how you sharpen your skills before taking them into a full-length course.
Why Micro Teaching Is Your Secret Weapon for Online Courses
Let's be honest: teaching online is a different world. You can't read the room or feel the energy in the same way. It's tough to know if you're actually connecting with your students.
This is exactly where micro teaching comes in. It’s not just an old academic exercise; it's a super practical tool for modern course creators.
Instead of getting overwhelmed by trying to perfect an entire module, you zoom in on one tiny, manageable skill. This could be anything from nailing your introduction, to explaining a complex graph, or asking a question that genuinely makes students think. The goal here is precision, not a complete overhaul.
Imagine a fitness coach struggling to demonstrate a new exercise on video. Instead of re-recording the entire hour-long workout, they’d be smarter to use a micro-lesson approach. They could practise just that one demonstration—the setup, the execution, the common mistakes—until it’s crystal clear. That’s the essence of micro teaching.
Build Confidence Through Repetition
One of the biggest hurdles for anyone teaching online is just feeling confident on camera. Micro teaching gives you a safe, low-stakes space to practise until that self-assurance becomes natural.
The idea is simple: focus on one skill, practise it in a short burst, get feedback, and do it again. This cycle is how you turn a good lesson into a great one, building real confidence each time.
This structured practice helps you master the little things that make a big difference. It's an excellent way to refine your delivery and even improve verbal communication skills, which are crucial for keeping online learners hooked. By honing in on specific areas, you make real, tangible progress that your students will notice.
A Proven Method for Better Teaching
This isn’t some new fad. Micro teaching has been around since the early 1960s, developed as a structured training method for teachers. It’s a globally recognised pedagogical tool for a reason—it works.
Its relevance is just as strong today. A study on Indian schoolteachers, for example, found that only 33.3% consistently used teaching-learning materials. This shows the ongoing need for the kind of focused skill development that micro teaching delivers so well. You can read more about the relevance of microteaching in classroom settings.
For the modern online course creator, this translates into direct benefits:
More Engaging Content: Your lessons become sharper, clearer, and far more impactful.
Increased Student Success: When you explain things well, your students actually learn and achieve their goals.
A More Professional Course: Polished delivery instantly boosts your credibility and makes you look like the expert you are.
By adopting a micro teaching approach, you’re investing in the small details that create a massive difference. The result is a superior learning experience for your students and more success for you.
Designing Your First Micro Teaching Lesson Plan
Putting together your first micro teaching lesson plan can feel like a big deal, but it's a surprisingly simple process once you get the hang of it. Forget about just filling in boxes on a template. The real goal here is to consciously isolate and polish a single teaching skill.
The key word is focus.
Think about how a musician practises. They don’t play an entire symphony to work on finger speed; they run scales over and over. Your micro-lesson is your scale—a short, concentrated exercise designed for the biggest possible impact.
This flow chart breaks down the whole micro-teaching cycle, from picking a skill to refining it through practice and feedback.
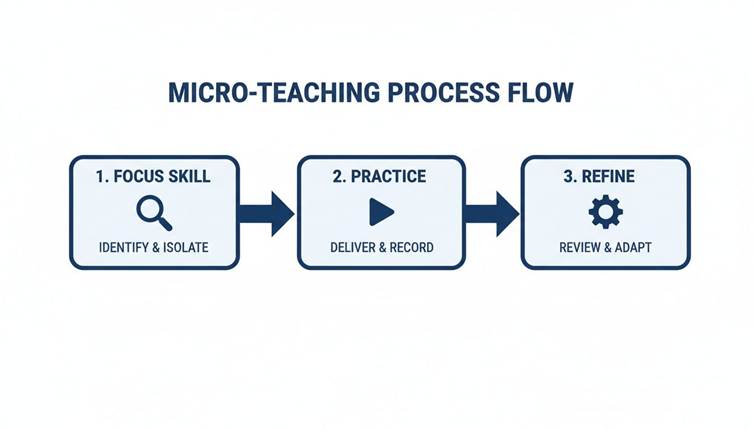
What you should notice is that it’s a loop. You focus, you practise, you get feedback, and then you refine and go again. That's how real improvement happens.
Start With One, Single, Measurable Objective
This is the most common mistake I see: trying to cram too much into one micro-lesson. Your objective needs to be laser-focused and something you can actually measure in a 5-10 minute window. A goal like "Teach photosynthesis" is way too big. It's a whole chapter, not a single skill.
Instead, zoom in on one tiny piece of that topic. A much better objective would be: "Students will be able to define the term 'chlorophyll' and point to its location on a plant cell diagram."
See the difference? It's specific, it's actionable, and you can tell in just a few minutes if they’ve got it.
Here are a few more examples of solid, focused objectives:
For a language tutor: "Learners will correctly conjugate the verb 'ser' in the present tense for the 'yo' and 'tú' forms."
For a business coach: "Participants will be able to list the three key components of a SWOT analysis."
For a fitness instructor: "Clients will demonstrate the correct form for a bodyweight squat, focusing on knee alignment and back posture."
Every one of these targets a small, observable result. This kind of clarity is what makes a micro-lesson work.
Core Components of a Micro Teaching Lesson Plan
To make this practical, every plan should have a few core elements. They provide the structure you need to stay on track and deliver a focused, high-impact session.
Component | Purpose | Example (For a 7-min lesson on 'Explaining a Concept') |
Learning Objective | To state the single, measurable outcome for the session. | Students will define 'chlorophyll' and identify its location. |
Introduction (Hook) | To grab attention and set the context in under a minute. | Start with a question: "Why are most plants green?" |
Core Content Points | To list the 2-3 essential pieces of information to be delivered. | 1. What chlorophyll is (pigment). 2. What it does (absorbs light). 3. Where it's found (chloroplasts). |
Interactive Activity | To get learners to actively engage with the content. | Ask learners to type their one-sentence definition in the chat. |
Assessment/Check | To quickly verify if the objective was met. | Show a cell diagram and ask, "Where is the chlorophyll?" |
Conclusion (Recap) | To summarise the one key takeaway and close the loop. | "So, chlorophyll is the green stuff that helps plants eat sunlight." |
This table isn't just a checklist; it's a roadmap to keep your 7-minute lesson tight, effective, and focused on the one thing that matters.
Time It Out: Plan Your Talking Points
Once you have your objective, map out the flow. This isn't a word-for-word script, but more like a sequence of your key points. For a 7-minute lesson, you have to be ruthless with your timing.
A simple structure that works well is:
Introduction (1 minute): Get their attention and tell them the single objective.
Explanation (3 minutes): Deliver the core information. Use a quick story, an analogy, or a simple visual.
Activity (2 minutes): Get your 'students' to do something to apply what they just heard.
Conclusion (1 minute): Quickly recap the main point and check for understanding.
This framework forces you to be concise. It makes you cut out everything that doesn’t directly help you achieve your one learning objective.
Plan One Simple, Interactive Activity
The activity is where the learning actually sticks. It needs to connect directly to your objective and be quick enough to fit into your tight timeframe. This is the "show me you get it" moment.
The point of the micro-activity isn't to test for mastery. It's to create a brief moment of active engagement that makes the learning stickier than just listening.
For instance, if your goal is for students to define 'chlorophyll', the activity could be as simple as asking them to type their own one-sentence definition into a chat box. If you're teaching 'ser' conjugations, you could ask them to say a sentence out loud using one of the forms.
Interaction is everything. Even if you're just practising by yourself, pause and do the activity as if you were a student. It’s a great way to see if your instructions are clear and your timing is realistic. For any educator building online courses, mastering these small interactive moments is crucial. You can find more ideas in our guide with essential tips for creating compelling online courses.
The Real-World Impact on Teaching Performance
This isn't just an academic exercise; it has a proven effect on teaching ability. Research consistently shows that micro-teaching significantly prepares educators for the classroom. A study on Bachelor of Education students, for example, found that the practice had a statistically significant positive impact on their future teaching performance.
Interestingly, the study also found that how effective the students perceived it to be was consistent across different subject specialisations and wasn't influenced by gender. It just works.
By breaking down the complex art of teaching into small, manageable skills, you create a clear path to get better. Your micro teaching lesson plan is the map for that journey, guiding you one successful step at a time.
Practical Scenarios and Sample Lesson Plans
Theory and templates are a great starting point, but seeing a micro-teaching lesson plan in action is what really makes the concept click. The true power of this method is how flexible it is across different fields. It doesn't matter if you're a wellness coach, a business consultant, or a language tutor—you can use this focused approach to sharpen your delivery.
So, let's move beyond the abstract and dive into three distinct, real-world scenarios. Each sample is a complete micro-lesson you can steal or adapt for your own use. You’ll see exactly how to isolate one specific skill and build a short, powerful practice session around it.
Scenario 1: For a Wellness Coach
Imagine a wellness coach who creates guided meditations for her online courses. She’s been told the first minute of her sessions feels a bit rushed, which stops people from properly settling in. This is a perfect problem for a micro-lesson to solve.
Teaching Skill: Set Induction (Creating a calm, focused opening).
Total Time: 7 minutes.
Objective: To guide a participant from a state of distraction to initial calm within the first 90 seconds of a meditation, using specific vocal pacing and calming language.
Here’s what her plan could look like:
Introduction (1 minute): State the one clear goal. "In this short practice, our only aim is to find a comfortable starting point for our meditation. We'll focus on just the first few breaths."
Guided Practice (4 minutes): This is the core teaching moment. The coach delivers her revised meditation intro, focusing on a slower pace, longer pauses, and gentle, invitational language (e.g., "When you feel ready," or "Gently allow your eyes to close").
Activity/Check-in (1 minute): Ask a single, reflective question. "On a scale of 1 to 5, where 1 is distracted and 5 is calm, what number are you at right now? No judgement, just notice."
Conclusion (1 minute): Briefly recap the experience. "Notice how just a few focused breaths can begin to shift our state. That's the foundation we build upon."
This plan isn't about the entire meditation. It’s about perfecting those crucial first moments that set the tone for everything that follows.
Scenario 2: For a Business Consultant
Now, let's think about a business consultant who teaches data analysis. His biggest challenge? Presenting complex charts without overwhelming his audience. He needs to nail the skill of "explaining a visual."
Teaching Skill: Explaining and Illustrating with Examples.
Total Time: 10 minutes.
Objective: The learner will be able to identify the main insight from a complex bar chart within 30 seconds of the explanation starting.
The structure of this micro-teaching lesson plan is all about clarity and impact.
The goal isn't just to show the data. It's to guide the audience's eyes and mind to the most important takeaway immediately. This micro-lesson isolates that exact skill.
Here’s a possible breakdown:
Set the Scene (1 minute): "We're going to look at one chart showing quarterly sales performance. Our goal is to find the single most important story this data is telling us."
The Explanation (5 minutes): The consultant presents the chart and walks through a structured explanation.
Orient (30 sec): "First, let's get oriented. The x-axis shows the four quarters, and the y-axis shows sales in millions."
Highlight (1 min): "Now, I want to draw your attention to one specific area—the dramatic jump between Q2 and Q3."
Explain (2 mins): "This jump was driven by the launch of our new marketing campaign in July. Let me show you the two key factors..."
Summarise Insight (30 sec): "So, the key takeaway here is that the new campaign had an immediate and significant impact on sales."
Interactive Check (3 minutes): Show a second, similar chart and ask, "Using that same method, what's the one-sentence story this new chart is telling you?" Give them a minute before sharing.
Wrap-up (1 minute): "By breaking down how we look at data, we can find the story much faster. That’s the skill we practised today."
Scenario 3: For a Language Tutor
Finally, let’s picture a language tutor. She wants her students to move beyond simple yes/no answers and start speaking more freely. To do that, she needs to get better at asking the right kind of questions.
Teaching Skill: Questioning Skills (Using open-ended questions).
Total Time: 5 minutes.
Objective: The student will respond to a prompt with at least two full sentences, showing a deeper level of engagement than a single-word answer.
This session is short and sharp, focused entirely on the art of the question. A powerful micro-teaching lesson plan for this could look like this:
The Plan:
Present a Simple Statement (30 seconds): "Yesterday, I went to the market."
Model a Closed Question (30 seconds): Ask a peer (or imagine a student), "Did you like it?" The expected answer is just "yes" or "no."
Model Open-Ended Questions (2 minutes): Now, re-engage with better questions.
"What was the most interesting thing you saw at the market?"
"How was it different from the last time you went?"
"Tell me about one person you spoke with."
Student Activity (1.5 minutes): Give a new statement, like "I watched a film last night." Then, instruct the student: "Ask me two open-ended questions about it."
Recap (30 seconds): "See how those 'what' and 'how' questions gave us so much more to talk about? That's what we'll be working on."
Each scenario shows how a focused plan can help you refine your teaching, one small skill at a time. This approach is fundamental to building high-quality learning experiences. You can explore more strategies for building entire programmes when you check out the different types of online courses you can create with Skolasti.
Mastering the Feedback and Reflection Loop
Let’s be real. Creating and delivering your micro teaching lesson plan is just the start. The real magic, the part where you actually get better, happens after your five-minute session is over.
It's all in the feedback and reflection loop. This is where you dissect what worked, what fell flat, and pinpoint exactly how to improve next time. Without it, you’re just rehearsing. With it, you're genuinely sharpening your skills as a teacher.
Sourcing Feedback That Actually Helps
Getting useful feedback is an art. Vague comments like "good job" or "that was confusing" don’t help you grow. You need specific, actionable insights you can immediately apply. The goal is to collect observations, not just opinions.
You have a few solid options for this:
Peer Review: Grab a fellow course creator or a trusted colleague. Hand them a checklist and ask them to watch your session. A clear guide helps them know exactly what to look for.
Mentor Guidance: An experienced instructor or coach can offer a whole other level of insight, connecting your small performance to broader teaching principles.
Self-Recording: This is easily the most powerful (and sometimes humbling) method. Record yourself on video. You’ll be stunned by what you notice about your own pacing, word choice, and body language when you see it from a student's point of view.
To take this even further, using tools to analyse your recordings can be a game-changer. For example, by mastering YouTube video transcripts, you can review your exact wording, spot filler words, and check if your explanations were as clear as you thought they were.
And the data doesn't lie. One study found that over 83% of student-teachers trained with this method hit high levels of teaching competence. After the training, the number of participants achieving top performance jumped by a massive 50%. It’s proof that the feedback loop is the engine of skill development.
Using an Observation Checklist
To make feedback truly effective, give your observers (or yourself) a structured checklist. This simple tool shifts the focus from subjective feelings to objective criteria. It forces everyone to concentrate on the specific skill you’re trying to improve.
Let's say you're working on 'Clarity of Instruction'. Your checklist might look like this:
Objective Stated Clearly: Was the learning goal shared right at the start?
Logical Flow: Did the explanation follow a clear, step-by-step sequence?
Use of Jargon: Was technical language either avoided or explained simply?
Pacing and Pauses: Was the pace slow enough for understanding, with natural pauses?
Example Relevance: Did the examples directly clarify the main idea?
This kind of structured observation eliminates vague feedback and gives you concrete things to work on.
To make this crystal clear, let's look at the difference between unhelpful feedback and the kind that actually drives improvement.
Effective vs Ineffective Feedback
Vague Feedback (To Avoid) | Specific & Actionable Feedback (To Use) |
"Your explanation was a bit confusing." | "When you explained the concept of photosynthesis, the jump from chlorophyll to glucose felt a bit sudden. Maybe add a step about energy conversion in between." |
"Good use of examples." | "The analogy comparing a cell to a factory was brilliant. It made a complex topic instantly relatable and easy to understand." |
"You spoke too fast." | "In the first two minutes, your pace was great. But when you started the activity instructions, it sped up, which might make it hard for students to follow." |
"I wasn't very engaged." | "The first part of the lesson was mostly lecture. Consider adding a quick poll or a 'what do you think?' question to pull the audience in earlier." |
See the difference? Specific feedback gives you a clear roadmap for what to change, while vague feedback just leaves you guessing.
Feedback is a gift. But like any gift, its value depends on how you use it. The goal isn't just to collect observations, but to turn them into a concrete plan for your next attempt.
Powerful Reflection Questions to Ask Yourself
Feedback from others is vital, but the deepest growth comes from your own reflection. After you’ve collected the observations, you need to sit down and think critically about what happened.
Don't just ask, "Was it good?" That's a dead-end question. Instead, ask better, sharper questions that lead to real insights.
Here are a few prompts to get you started:
What was the single most engaging moment? Why do I think it worked so well?
Where did I feel my confidence dip? What triggered that feeling?
If I had to re-teach this exact lesson right now, what is the one thing I would do differently?
Did my activity directly help the learning goal, or was it just a distraction?
How could I have explained the main idea with a better analogy or a simpler example?
This isn’t just navel-gazing. This is what separates simple practice from deliberate practice. It’s how you take ownership of your growth and ensure every micro-lesson makes you a better, more effective teacher.
Adapting Micro Teaching for Your Online Academy
Let's be clear: micro teaching isn't just for physical classrooms. Taking these principles online is one of the most powerful ways to sharpen your digital teaching skills.
The core loop—practice, get feedback, and refine—works brilliantly in a virtual setting. You're just swapping a whiteboard for a few digital tools. A solid micro teaching lesson plan brings a level of focus and clarity that's absolutely essential for holding a learner's attention through a screen, whether you're teaching live or creating pre-recorded videos.
Running Live Micro Teaching Sessions Online
When it comes to live practice, today's video conferencing platforms give you everything you need to recreate the micro teaching experience. The real trick is to use their features intentionally, not just as a way to broadcast your face.
Instead of just talking to a grid of silent boxes, you can build a genuinely dynamic practice environment. This is how you get that real-time interaction and immediate feedback that drives rapid improvement.
Here are a few practical ways I’ve seen this work wonders:
Use Breakout Rooms for Peer Groups: This is my favourite. Split your participants into small groups of three or four. In each room, one person teaches, another observes with a simple checklist, and the rest act as students. It creates a safe, low-stakes space to fail and learn.
Leverage Polls for Instant Feedback: Right after a 5-minute teaching block, the "teacher" can launch a quick poll. Don't ask vague questions. Get specific: "On a scale of 1-5, how clear was the main learning point?" This gives you immediate, hard data.
Embrace Screen Recording for Self-Reflection: Honestly, this is your secret weapon. Record your session and force yourself to watch it back later. You'll catch all the verbal tics, pacing issues, and even the small moments of connection that you'd completely miss otherwise.
The online format gives you a massive advantage here: the power to easily record and review every single practice session. You’re building an invaluable library of your own teaching evolution, which makes self-assessment incredibly precise.
Applying Micro Teaching to Pre-Recorded Content
These same principles are a game changer for anyone creating video modules for a self-paced course. Forget trying to record a perfect, 45-minute lecture in one go. It’s exhausting and rarely effective.
Instead, think in micro-lessons. Plan, script, and record a single 5-minute video that masters one crucial skill or concept. This approach not only makes your content better but also makes the whole creation process feel less daunting. You're breaking a huge project into a series of small, satisfying wins.
As you get comfortable building these learning experiences, it’s a natural next step to think about how technology can help you scale. We've put together some thoughts on the future of AI in education and how it’s shaping the next wave of online academies.
A Real-World Scenario: Creating Course Videos
Let’s say you’re building a course on digital photography. The old way would be to record a long, rambling video called "Understanding Your Camera." A micro teaching mindset is far more effective for your students.
You'd break that huge topic down into a series of short, punchy videos, each with a single, clear objective:
Video 1 (5 mins): How to correctly hold your camera for maximum stability.
Video 2 (7 mins): Explaining aperture and its direct effect on depth of field (with examples).
Video 3 (6 mins): A practical guide to adjusting ISO for low-light shots.
Each video is its own micro-lesson, planned and delivered with a singular purpose. Not only is this content easier for you to produce, but it's also far more digestible and genuinely useful for your learners. Every piece of content delivers focused, practical value.
Of course. Here is the rewritten section, crafted to sound completely human-written and match the provided style examples.
Common Questions About Micro Teaching Plans
Whenever you try a new teaching method, questions are bound to pop up. It’s only natural. For online instructors and course creators getting started with a micro teaching lesson plan, a few key queries always seem to come up first.
Let's clear the air and tackle those common questions head-on. Getting these answers straight will give you the confidence to dive in and start using this incredibly effective practice.
How Long Should a Micro Teaching Session Be?
Keep it short. Really short. A typical micro teaching session should only last between 5 to 15 minutes. This isn't a limitation; it's the whole point.
The goal is to laser-focus on a single teaching skill without getting sidetracked. This brief window forces you to be concise and allows for highly concentrated practice on one specific technique. It also makes it possible to get immediate, targeted feedback and even re-teach the lesson right away to apply what you’ve learned.
For online course creators, this is the perfect length for a punchy, high-impact video module that nails one core concept before moving on.
Can I Do Micro Teaching by Myself?
Absolutely. While getting feedback from a peer or mentor is fantastic, don't underestimate the power of self-assessment. For a solo course creator, it’s often the most practical and accessible way to get started.
The process is refreshingly simple:
Record Yourself: Just use your phone or webcam to film yourself delivering the micro-lesson.
Use a Checklist: As you watch the recording, use a feedback rubric or a simple checklist to guide your review.
Analyse Your Performance: Be honest with yourself. How was your pacing? Was your explanation clear? Did your examples land? How was your on-camera presence?
This kind of self-reflection is brilliant for refining your video lessons before they ever reach your students.
You are often your own best critic. A recording doesn't lie—it gives you indisputable evidence of what’s working and what needs a little polish, helping you make precise, meaningful improvements.
What Are the Most Important Skills to Practice?
This really depends on your subject and personal teaching style, but some skills are just universally important for great teaching. If you're not sure where to begin, I always recommend starting with the fundamentals—the skills that give you the most bang for your buck in terms of student learning.
Here are a few high-impact skills to focus on first:
Set Induction: How well do you hook your learners in the first 60 seconds? This is about grabbing their attention and setting the stage for what's to come.
Questioning Skills: Are you mastering the art of asking open-ended questions that spark critical thinking, or are you sticking to simple, closed-ended questions?
Explaining with Examples: Can you break down complex ideas using clear, relatable analogies and real-world examples? This is a game-changer.
Pacing and Pausing: Do you use silence effectively? A deliberate pace and well-timed pauses give learners a moment to process information.
Achieving Closure: How do you wrap things up? A strong summary of the key takeaways ensures your lesson actually sticks.
My advice? Pick the one skill you feel least confident in and start there. Every small improvement you make will add up to a big difference in the quality of your teaching.
At Skolasti, we believe in giving creators tools that help you teach smarter, not harder. Our all-in-one platform is built to help you launch, market, and scale your online academy, and it even includes an AI Teaching Assistant to support your students 24/7. Ready to create learning experiences that get results? Explore how you can build your own online academy.