
Let's be real—the old "watch and repeat" model for online courses just doesn't cut it anymore. If you want to deliver real transformation, you have to get students out of the passenger seat and into the driver's seat. The steps of the project method are your roadmap for this, turning passive learning into a hands-on experience that forges real-world skills.
Why Project-Based Learning Is Your Secret Weapon
Forget the dry academic theory for a moment. Let's talk about what actually works in the trenches. The project method isn't just about tacking on a final assignment; it's a fundamental shift in how you design your entire course. It’s the difference between telling someone how to build a website and actually guiding them as they build one from scratch.
When you anchor your course around a central, meaningful project, you're not just throwing information at your students. You're creating an environment where skills are actually forged. This approach is a gamechanger for a few critical reasons.
Drive Deeper Learning and Retention
Facts are fleeting, but skills earned through struggle and application? Those stick. By immediately applying concepts to a tangible project, your students internalise knowledge in a way that watching videos or reading text can never match. The act of problem-solving, failing, and finally succeeding creates much stronger neural connections.
This isn't just a hunch; the data backs it up. In the Indian education system, for example, the project method is showing powerful results. A 2023 study found that students guided by the steps of the project method scored a massive 28% higher in science subjects compared to those in traditional lecture-based classes.
Boost Motivation and Course Completion
A well-designed project gives students a clear, compelling mission. That sense of purpose is a huge motivator, especially in a self-paced online setting where it's all too easy to lose steam. Instead of just checking off modules, they see visible progress on something that actually matters to them.
The project method reframes the entire learning journey. It stops being about "getting through the content" and becomes a quest to create something valuable. That one shift can be the difference between a student dropping off and a student finishing strong.
Generate Powerful Social Proof
Think about it. What’s a better testimonial? A student saying they "enjoyed the course," or a student proudly sharing the incredible app, portfolio, or business plan they built in your course?
Completed projects are undeniable proof of the transformation you deliver. They become your most authentic marketing assets, attracting new students who want the same concrete outcomes. For more ideas on keeping students hooked, check out our guide on other essential online course tips. Ultimately, using the project method isn't just a teaching tactic—it's a business strategy for creating a more effective, valuable, and marketable online course.
Setting the Stage for a Successful Project
A great project doesn't start with a to-do list; it starts with a story. Before your students write a single line of code or design their first graphic, you have to set the stage. This means creating a situation and giving them a clear purpose. Honestly, these first two steps are probably the most important—they provide the context and motivation that will carry everyone through the entire project.
Think of it like the opening scene of a great movie. It has to hook you, establish what’s at stake, and give you a reason to care. A bland, generic project prompt just falls flat. It fails to spark the curiosity needed to get students truly invested.
Crafting an Authentic Scenario
Your first move is to create an authentic scenario—a situation pulled from the real world that actually resonates with your students. This isn't about inventing some far-fetched problem. It's about grounding the project in a context they understand and find meaningful. An authentic scenario makes the work feel less like a school assignment and more like a genuine challenge worth tackling.
Here are a few examples of what I mean:
For a digital marketing course: "You've just been hired as a freelance strategist for a local café. They're struggling to attract younger customers, and your job is to develop and launch a 30-day social media campaign to boost their foot traffic by 15%."
For a wellness coaching programme: "A new client has come to you feeling completely burnt out and overwhelmed. Your project is to design a personalised four-week wellness plan that hits their specific goals for stress reduction and better sleep, which you'll present to them at the end."
For a coding bootcamp: "A small non-profit needs a simple, functional website to collect donations and share their mission. Your team's task is to design, build, and deploy a responsive site that meets their core needs."
See how each one defines a role, a real problem, and a clear deliverable? That’s the secret sauce for making a project feel real and immediately useful.
A project without a compelling scenario is just a solution looking for a problem. It lacks urgency and relevance. By rooting your project in a tangible, real-world context, you give students a powerful 'why' that drives them through the 'how'.
Defining a Clear Purpose and Learning Outcomes
Once you’ve got a killer scenario, the next step is to nail down the project's purpose. This is where you translate that story into clear, measurable learning outcomes. What specific skills or knowledge will your students actually have by the time they finish this? This is how you align the project directly with the promises you made in your course description.
A strong project purpose answers the question: "What will I be able to do after this?" It shifts the focus from just absorbing information to actively proving you can apply it. To get this right, focus on action verbs.
So, instead of a fuzzy goal like "Learn about content marketing," you'd define outcomes like these:
Analyse a target audience to find content gaps.
Create a three-month content calendar that supports business goals.
Write and publish three high-quality blog posts optimised for search engines.
Measure the performance of your content using key analytics.
This level of clarity is a game-changer. It gives students a roadmap to follow and gives you a solid framework for assessing their work. It ensures every single task within the project is intentional and builds towards a valuable, real-world skill.
This foundational work—combining a rich scenario with a sharp purpose—is a critical part of the steps of the project method. It’s what turns a simple task into a meaningful experience, setting the stage for deeper learning, better engagement, and a much more successful outcome for everyone involved.
Building and Executing Your Project Blueprint
Okay, you've got a compelling scenario and a clear purpose. That’s the heart and soul of your project. Now it's time to become the architect and build the blueprint that will guide your students from A to B.
This is where we get into the nitty-gritty of planning and executing. We’re taking your big idea and turning it into a structured, step-by-step journey that feels completely doable for your learners. The goal here is to break down a potentially massive project into small, manageable milestones. A solid plan kills overwhelm before it starts and gives students a clear path forward.
This flow shows how the scenario and purpose you’ve already built are the essential foundation for everything that comes next.
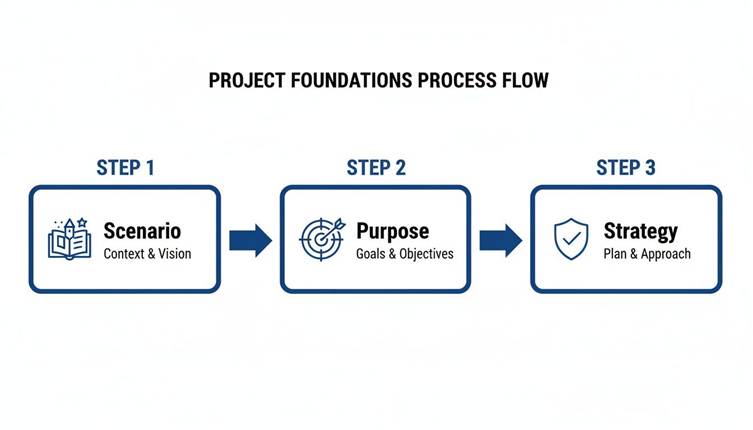
Without a strong "why" (the scenario) and a clear "what" (the purpose), any plan you create will feel hollow and disconnected.
Deconstructing the Project into Milestones
Here’s the biggest mistake I see course creators make: they present the final project as one giant, intimidating task. That’s a recipe for student anxiety.
The secret is to deconstruct it. Break the project down into logical phases or milestones, each with its own mini-deliverable. This creates a series of small wins that keep students motivated and moving.
Think of it like building a house. You don’t just show up with a pile of bricks. First, you clear the land (Milestone 1). Then you pour the foundation (Milestone 2). Then you erect the frame (Milestone 3). Each step is distinct and builds on the last.
For an online course, this might look like:
Research & Discovery: Students gather intel, analyse case studies, or do audience research.
Outlining & Structuring: They create a wireframe, storyboard, or a detailed outline for their project.
Drafting & Creation: This is the core 'building' phase where they write the copy, design the visuals, or code the app.
Refinement & Editing: They review their work, get feedback from peers, and polish the final product.
A phased approach just makes the project feel achievable. To make sure your blueprint is solid, checking out the best way to document processes can give you a modern playbook for success.
Setting Realistic Timelines and Resources
Once you have your milestones, you need to attach realistic timelines to each one. If you're running a cohort-based course, these are firm deadlines. For a self-paced course, they act as suggested guides to keep students from falling behind.
Be generous. Please, be generous with your timelines. Your students have jobs, families, and lives outside your course. Pad your estimates to account for the unexpected.
Alongside timelines, you must provide the right resources. Don't assume students know where to find a good template or the right software. Your job is to curate the tools they need to win.
Providing resources isn't hand-holding; it's removing friction. By giving students templates, checklists, and curated tools, you let them focus their brainpower on learning and creating, not on logistical headaches.
For instance, a photography instructor running a 'client photoshoot' project might provide:
A client brief template.
A shot list planner.
An example of a model release form.
Links to recommended editing software.
These resources are part of the scaffolding. They provide structure without giving away the answers.
Executing the Project with Empowerment
The execution phase is where the real work—and the real learning—begins. Your role now shifts from architect to facilitator. Your goal is to create an environment that encourages independence, collaboration, and resilience.
This is where students grapple with the material and apply it in a real-world context. This is what gets results. A study from India's NCERT Annual Status of Education Report (ASER) found that in schools using the project method, maths proficiency jumped from 41% to 68% between 2022 and 2025. That kind of leap shows just how powerful a structured "doing" process is.
Facilitating Collaboration and Support
Even if the project is a solo endeavour, a sense of community is crucial. Set up channels where students can ask questions, share their progress, and give each other feedback. On a platform like Skolasti, this could be a dedicated project forum or specific channels in your community space.
For group projects, clear guidance is even more critical. Give them a collaboration guide that outlines roles, communication expectations, and how to handle disagreements.
Checklists are another simple but powerful tool for empowerment. A quick checklist for each milestone helps students self-monitor their progress and ensures they haven't missed anything important. This builds their sense of ownership.
This is also where tech can lend a hand. An AI Teaching Assistant, for example, can offer students on-demand guidance 24/7. To see how an AI can support your course, we have a helpful guide on using an AI Teaching Assistant you can check out. This frees you up to provide the deep, personalised feedback where it really counts.
Here's a quick checklist you can use to make sure your project plan is solid from the get-go.
Project Planning Checklist for Online Course Creators
This checklist will guide you through the essential planning and execution phases for your project-based course, ensuring you've covered all your bases.
Phase | Key Action | Skolasti Tool to Use | Example |
Foundation | Define a clear, real-world scenario and purpose. | Course Description, Welcome Module | "You are a freelance marketer hired by a local cafe to launch their new loyalty program." |
Blueprint | Break the project into 3-5 distinct milestones. | Course Curriculum, Lesson Structure | Milestone 1: Customer Research. Milestone 2: Campaign Outline. Milestone 3: Content Creation. |
Resources | Create or curate templates, checklists, and tools for each milestone. | Course Resources, Digital Products | Provide a "Customer Persona Template" and a "Campaign Budget Spreadsheet". |
Timelines | Set realistic deadlines (for cohorts) or pacing guides (for self-paced). | Cohort Scheduler, Lesson Drip | "Milestone 1 is due by Friday of Week 1." |
Support | Establish a dedicated space for questions and peer feedback. | Community Forums, Live Class Q&A | Create a #project-help channel in your community. |
Execution | Deploy checklists for each milestone to empower student self-assessment. | Assessments (as checklists), Lesson Downloads | A downloadable PDF checklist for "Final Project Submission Requirements". |
By combining a solid plan with empowering execution strategies, you create a project experience that is not only effective but also deeply rewarding for your students.
Right, let's talk about feedback. Once your students have done the heavy lifting on their projects, we hit what might be the most crucial step of the entire method: the evaluation. This is so much more than just slapping a grade on their work; it’s about closing the loop on their learning.
Good feedback is what turns a finished project from a simple completed task into a genuine learning moment, locking in new skills and, just as importantly, building their confidence.
But let's be honest, this final phase can feel a bit daunting for everyone involved. How do you assess creative, complex work objectively without crushing someone's spirit? The trick is to change your mindset. You're not "judging" their work. Think of it as a collaborative debrief, a conversation focused entirely on growth.
Build Rubrics That Actually Bring Clarity
Your best friend in this whole process is a well-designed rubric. A good rubric is the foundation of fair, effective, and fast evaluation. It completely demystifies your expectations and gives both you and your students a clear, objective standard to measure their work against.
No more guesswork for them, and a much more consistent and efficient feedback process for you.
A strong rubric doesn't need to be some complex, multi-page document. It just needs to clearly outline the criteria for success and describe what different levels of quality look like for each one. This transparency is empowering because students know exactly what you’re looking for from the very beginning.
For instance, if the project is to design a social media campaign, your rubric might include criteria like:
Audience Analysis: Did the student clearly define and describe their target audience?
Content Quality: Is the content engaging, well-written, and does it match the brand's voice?
Strategic Plan: Is there a logical plan for posting, engagement, and, crucially, measuring results?
Visual Design: Are the graphics professional, on-brand, and optimised for each platform?
Then, for each of those points, you'd briefly define what "Excellent," "Good," and "Needs Improvement" actually looks like. This simple structure makes your feedback specific and, most importantly, actionable.
Deliver Feedback That Encourages and Guides
With a solid rubric ready, it's time to deliver the feedback itself. The goal here is a delicate balance: be both honest and constructive, always pointing towards a clear path for improvement. Vague comments like "Good job!" or "This needs more work" are pretty much useless. Actionable feedback is always specific.
So, instead of saying, "Your strategic plan is weak," try something more direct and helpful: "Your plan identified the right platforms, which is great, but it's missing the specific metrics you'll use to track success. How will you measure the campaign's impact? Think about adding Key Performance Indicators (KPIs) like engagement rate and click-through rate." See the difference? Now they know exactly what to do next.
Feedback is a dialogue, not a verdict. Its purpose is to open the door to improvement, not shut it with a final grade. The best feedback inspires a student to look at their work with fresh eyes and see the potential for what it could become.
And remember, written comments aren't your only option. You can make feedback much more personal and engaging by mixing up the format:
Short Video Feedback: Record a quick screencast of you walking through their project. This is incredibly powerful and personal.
Audio Notes: Sometimes, leaving a brief audio message can convey tone and encouragement far better than plain text ever could.
Peer Feedback Sessions: Set up a structured peer review process. This is a fantastic way for students to learn from each other and gain a different perspective on their own work.
Spark Deeper Learning with Self-Assessment
One of the most powerful—and most frequently missed—parts of any project evaluation is self-assessment. Asking students to reflect on their own process is where the real, deep learning cements itself. It shifts the ownership of their growth right where it belongs: on their own shoulders.
Before you even share your feedback, get them to complete a simple self-assessment. A few guiding questions are all you need. This pushes them to think critically about the entire journey, not just the final thing they submitted.
Guiding Questions for Student Reflection
What part of this project are you most proud of, and why?
What was the biggest challenge you faced, and how did you tackle it?
If you had one more week to work on this, what would you change or improve?
What's the single most important skill you learned or strengthened by doing this project?
This simple act of reflection does two things. First, it primes them to receive your feedback with a much more open mind. And second, it helps them internalise the lessons learned, making sure the skills they've gained will actually stick with them long after your course is over.
Structuring the Final Showcase
The final presentation is the culmination of all their effort. It's their chance to showcase what they built and, just as importantly, explain what they learned along the way. Frame this not as a high-pressure exam, but as a celebration of their progress.
Whether it’s a live presentation during a cohort call or a recorded video they submit, structure is key. Give them a clear template or outline for their presentation. Guide them to cover not just the "what" (their final product) but also the "how" and the "why"—their process, the hurdles they overcame, and their key takeaways.
This final step brings the whole project method full circle. It connects the initial scenario you gave them with a tangible outcome and a thoughtful summary of their learning journey. By focusing on clear rubrics, actionable feedback, and structured reflection, you transform the evaluation phase from a chore into one of the most valuable parts of your online course. You ensure students don't just finish the project—they grow from it.
Using Technology to Streamline Your Project Method
Implementing the project method doesn't mean you have to drown in admin. Far from it. In fact, modern online course platforms are built to handle the heavy lifting, letting you focus on teaching while the tech manages the logistics. The real trick is moving from theory to action—using these tools smartly to make every stage of your project better.

Let's make this practical. Imagine you're launching a 'Build Your Personal Brand' online course. The main project is for each student to create and launch a personal brand kit—mission statement, visual assets, a content plan, the whole package. Here’s how you can use technology to make this a seamless, high-impact experience for everyone.
AI Assistants for Scalable Support
One of the biggest anxieties I hear from creators about project-based learning is the potential flood of student questions. This is where an AI Teaching Assistant becomes your most valuable player.
Instead of answering "Where can I find the brand template?" fifty times, the AI handles it instantly. You train it on your course materials, and suddenly you have 24/7 support. It can answer logistical questions, clarify instructions, and even offer initial feedback based on the rubrics you’ve set up.
Think about it. A student in your branding project could ask, "What are the key elements of a strong mission statement?" and get an immediate, helpful answer pulled right from your lessons. This frees you up to provide the deep, strategic feedback that only a human expert can give.
An AI assistant doesn't replace you; it amplifies you. It handles the repetitive queries so you can dedicate your time to the high-level mentoring that drives real transformation.
Cohort Features for Vibrant Collaboration
The project method thrives on collaboration. It’s all about that peer feedback loop. Using cohort-based features on a platform like Skolasti can bring this interaction to life. You can create dedicated community spaces or forums for each project milestone, so the conversation stays focused.
For the 'Build Your Personal Brand' project, this could look like:
A "Mission Statement Workshop" channel where students post their first drafts for peer review.
A "Visual Mood Board" gallery where learners share design inspiration and get feedback on their visual direction.
Live "Content Plan" review sessions where you host a group call for students to present their strategies and get real-time input.
These structured interactions stop students from feeling like they're working in a silo. They create a supportive ecosystem where people learn just as much from each other as they do from you. Modern platforms offer a variety of powerful course creation features that are perfect for building this kind of collaborative atmosphere.
Analytics for Proactive Intervention
How do you know where your students are getting stuck before they hit a wall and get frustrated? Course analytics are your answer. By tracking progress, you can see which parts of the project are causing the most friction.
If you look at your dashboard and see that 75% of your students haven't completed the "Visual Assets" milestone by the deadline, that’s a huge signal. It tells you that you might need to drop in some more resources, host a quick Q&A, or clarify the instructions for that step. This data lets you be a proactive guide rather than a reactive troubleshooter, jumping in right when your help is needed most.
Integrating External Tools for Efficiency
Finally, using technology wisely also means pointing students toward tools that make their lives easier. You don't have to build everything yourself.
If your students are analysing competitor content or their own video drafts, a tool like a video to notes converter can be a massive time-saver. It streamlines how they process information and document their findings, letting them focus on the creative work.
By combining the power of an AI assistant for support, cohort features for community, and analytics for insight, you can implement the steps of the project method without creating an unmanageable workload. You build a dynamic, supportive, and efficient learning environment that saves you time and gets incredible results for your students.
Got Questions About the Project Method?
Even the best-laid plans run into real-world snags. When you start implementing the project method, a few practical questions always pop up. Let's tackle the most common ones I hear from course creators, so you can adapt the steps of project method to whatever your course throws at you.
Can This Really Work for a Self-Paced Course?
Absolutely. The trick is to engineer a structure that guides students without you needing to be there 24/7. For a self-paced setup, your focus should be on automated milestones and crystal-clear self-assessment tools.
Build Detailed Checklists: Don't just list tasks. Create comprehensive checklists for each project phase that empower students to check their own work against a gold standard.
Lean on Asynchronous Feedback: Set up dedicated forums or community channels. This is where learners can post their work-in-progress and get peer feedback on their own time, creating a learning loop that runs itself.
Deploy an AI Assistant: An AI Teaching Assistant is a game-changer here. It can instantly handle the common, repetitive questions, freeing you up for the high-impact mentoring only you can provide.
So, What’s the Ideal Project Size?
There's no magic number—it all comes down to your course length and what you promise your students. The project needs to be meaty enough to feel like a real accomplishment, but not so massive it causes burnout.
A good rule of thumb? Match the project's scope to the transformation you're selling. If you're running a short, two-week course on creating social media graphics, a project to design a five-post campaign series is just right. But for a three-month coding bootcamp, you'll want a full-blown capstone project where students build a complete web application from scratch.
The best project isn't the biggest one. It's the one that most convincingly proves a student has mastered the core skills you teach. Always go for depth of learning over sheer size.
How on Earth Do I Manage All the Feedback?
This is the big one—the fear that holds many creators back. But managing feedback is all about working smart, not hard. First off, a detailed rubric isn't optional; it's your best friend. It makes your feedback faster, more consistent, and way more objective.
Second, get out of the mindset that you have to do it all yourself. Set up structured peer review sessions where students use your rubric to give each other constructive feedback. This doesn't just lighten your load; it actually deepens their own understanding of what "good" looks like.
Finally, here's a pro tip: instead of typing the same feedback over and over, record a short video addressing the common mistakes you're seeing across multiple submissions. It’s more personal, more efficient, and often much clearer for your students.
Ready to implement a high-impact project method without the administrative headache? Skolasti provides all the tools you need—from an AI Teaching Assistant to cohort features—to create transformative learning experiences. Start your 30-day free trial and build your online academy today.