A Modern Educator's Guide to Teaching Aids for Science
A Modern Educator's Guide to Teaching Aids for Science
A Modern Educator's Guide to Teaching Aids for Science
Feb 23, 2026
Feb 23, 2026
Feb 23, 2026

At its core, a teaching aid for science is any tool that makes an abstract concept real. It could be a physical model, a hands-on lab kit, or even an interactive digital simulation. Think of these aids as the essential bridge between dry textbook theory and actual, real-world understanding. They’re what turn passive reading into active discovery.
Bringing Science Concepts to Life
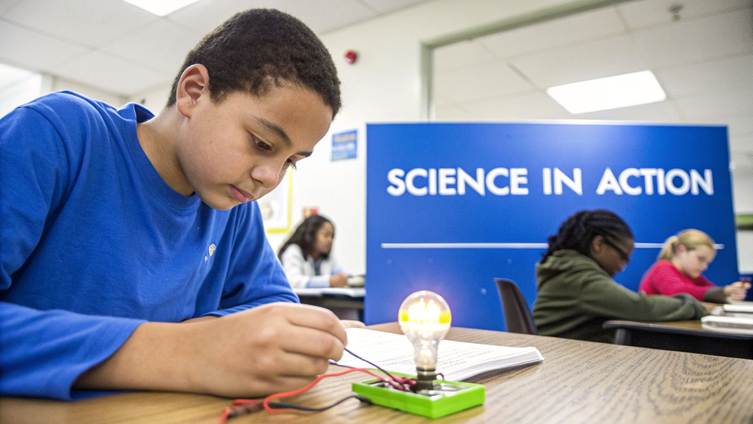
Picture this: a student’s eyes lighting up as they finally complete an electrical circuit and a bulb glows. Now contrast that with the blank stare you get after explaining the definition of "voltage" for the third time.
That spark of understanding? That's the power of a great teaching aid for science. These tools aren’t just classroom decorations; they are the link that connects abstract principles to memorable, hands-on experiences.
The goal is to get past forgettable definitions. The right aid—whether it’s a physical model of a DNA helix or a digital simulation of planetary orbits—makes science feel intuitive. When a learner can see, touch, and interact with a concept, their understanding deepens in a way that just isn't possible with words alone. In fact, research consistently shows that active learning methods give student performance in science a significant boost.
Why Visual and Tactile Aids Matter
So much of science deals with things that are too small, too large, or just too abstract to observe directly. We can't see atomic structures, the true vastness of space, or the flow of electrons with our own eyes. Teaching aids act as interpreters, translating these complex ideas into a language our brains can actually process.
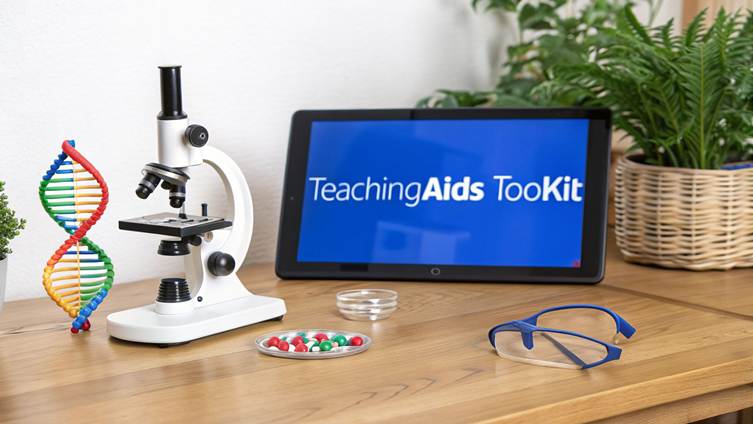
Concrete Representation: Physical models give a tangible form to invisible ideas, like using ball-and-stick models to show how chemical bonds really work.
Safe Exploration: Digital simulations let students run experiments that would be too dangerous or expensive for a real lab—think mixing volatile chemicals or simulating a supernova.
Enhanced Engagement: An interactive tool will always capture attention better than a static block of text, sparking real curiosity and encouraging students to ask deeper questions.
"The difference between telling a student about photosynthesis and letting them see a plant respond to light is the difference between knowing a fact and truly understanding a process."
This guide is your blueprint for making science accessible, engaging, and unforgettable. We’re going to frame these aids as essential parts of your teaching toolkit, not just optional add-ons. You’ll discover the full spectrum of resources out there, from simple worksheets to advanced virtual reality labs.
More importantly, you'll learn how to pick the perfect tools for your specific learners and curriculum. We'll also explore how modern platforms can help you protect your own unique educational content—like custom-made videos or interactive quizzes—so you can share or even sell your expertise securely. The journey starts now, with the simple recognition that the right aid can transform an ordinary lesson into an extraordinary experience.
Exploring the Spectrum of Science Teaching Aids
Think of teaching aids for science less like a random supply list and more like a specialist's toolkit. A mechanic can't fix every engine with just a wrench, and an educator needs a whole range of tools to solve different learning puzzles. Each type of aid has a unique job, making abstract science concepts real and understandable in its own way.
Some tools are for getting your hands dirty, others for seeing what the naked eye can't, and a growing number offer a safe, virtual space for unlimited experiments. Understanding this spectrum is key. It lets you pick the right tool for the right learning goal, building a teaching arsenal that works for every student.
Hands-On Kits and Lab Equipment
This is where science gets real. These are the tools for direct, tangible discovery—the explorer’s backpack of science education. Learning jumps off the page and into the physical world. The whole point is that we learn best by doing.
These aids range from the classics like microscopes, beakers, and Bunsen burners to neatly packaged experiment kits. A microscope turns a drop of pond water into a bustling universe of microorganisms, creating a genuine "wow" moment. DIY kits, like those for building a simple motor or a bubbling volcano, let students see cause and effect play out right in front of them.
The ultimate guide to science kits for kids is a fantastic resource, breaking down all the options for these hands-on experiences. Pre-packaged kits are especially handy because they save teachers prep time and ensure students have everything they need to dive in. The real win here is kinesthetic learning; it builds a muscle memory for scientific processes.
Models and Demonstrations
If hands-on kits are for exploring, then models and demos are the architect's blueprints. Their job is to make sense of things that are too big, too small, or too abstract to see directly.
Think of a classic planetary model showing the orbits in our solar system or a double helix model illustrating the elegant structure of DNA. These aren't just static displays; they are three-dimensional maps of complex ideas.
These aids simplify complexity without dumbing it down. A good model lets a learner walk around an idea, see it from all angles, and understand spatial relationships that a flat diagram just can’t show.
Demonstrations take this a step further by putting a process in motion. The classic Mentos and soda eruption is a perfect example, vividly showing gas release and nucleation. These are powerful because they’re memorable. They create a shared experience for the whole class that sparks great questions and deeper discussions.
Visual and Auditory Aids
This category covers everything from old-school wall charts and diagrams to modern instructional videos and podcasts. These aids are the storytellers in the science classroom, translating dense data and complex steps into formats that are easy to follow. Their real power is in presenting information clearly and in sequence.
Diagrams and Charts: A well-labelled diagram of the water cycle or a clear chart of the periodic table can deliver a huge amount of information at a glance. They organise knowledge visually, helping students spot patterns and relationships.
Instructional Videos: Videos are perfect for showing experiments that might be too dangerous, expensive, or time-consuming for the classroom. For instance, a video of a chemical reaction can be paused and replayed to analyse every stage, offering a level of detail and safety that a live demo can't match.
These tools are brilliant for introducing a new topic or for cementing ideas after a hands-on activity. They speak directly to visual and auditory learners, ensuring everyone gets the message through multiple channels.
Digital and Interactive Resources
Welcome to the virtual lab—a space where experiments have no limits and mistakes are just another chance to learn. Digital teaching aids for science have blown the doors open for educators, offering experiences that were once pure science fiction.
This includes everything from online simulations and virtual labs to augmented reality (AR) apps and AI-powered tutors. A simulation might let a student dissect a virtual frog without any ethical concerns or experiment with genetic mutations without real-world consequences.
AR apps can overlay digital information onto the real world. Imagine pointing a tablet at a leaf and seeing its cellular structure pop up on the screen. These tools make learning incredibly dynamic and hands-on. They provide instant feedback and let students repeat tricky procedures until they get them right, putting them firmly in the driver's seat of their own education.
To help you decide which tool fits which job, here's a quick comparison.
Comparing Different Types of Science Teaching Aids
This table offers a quick comparison of the primary types of teaching aids, highlighting their core strengths, best use cases, and typical cost considerations to help educators make informed decisions.
Aid Type | Key Strength | Best For | Cost Level |
Hands-On Kits/Lab Gear | Kinesthetic Learning | Direct experimentation, process skills | Low to High |
Models & Demos | Visualising the Abstract | Complex structures, processes (e.g., DNA) | Low to Medium |
Visual & Auditory Aids | Clear Information Delivery | Introducing topics, reinforcement | Low to Medium |
Digital & Interactive | Safe, Repeatable Practice | Simulations, virtual experiments, AR | Free to High |
Ultimately, the most effective science classroom uses a blend of these aids. Each one offers a different pathway to understanding, ensuring that no matter how a student learns best, there's a tool ready to help them connect with the wonders of science.
How to Choose the Right Teaching Aids
Picking the right teaching aids for science isn’t about grabbing the shiniest new toy. It's a strategic move that can literally make or break a lesson. A great aid acts as a bridge, turning a confusing topic into something crystal clear and memorable. But a bad choice? That just leads to glazed-over eyes, disengaged students, and wasted time.
The real key is to stop thinking, "what's available?" and start asking, "what's most effective?" This means you have to measure every potential tool against a simple set of rules tied directly to your students and what you want them to learn. You're looking for that perfect fit—a tool that feels like it was made for your lesson.
Align with Learner Age and Ability
First things first: who are you teaching? This is the most important filter. An aid that’s a home run for a secondary school student will completely miss the mark with a primary school learner. It all comes down to how we think, which shifts from concrete to abstract as we get older.
For younger students (ages 5-10), learning has to be tangible. They need to see, touch, and move things around to build those foundational concepts in their minds.
Best for this group: Simple, physical models (like a big, colourful model of a flower), hands-on kits with large, easy-to-manage parts, and animated videos that tell a story to explain a process.
Avoid: Complex digital simulations that have too many buttons and variables, or dense diagrams that demand abstract thinking they haven't developed yet.
For older students (ages 11 and up), their capacity for abstract thought is kicking in. They can start to get their heads around more complex information and systems they can't physically see.
Best for this group: Interactive digital simulations (like a virtual chemistry lab where things can safely "explode"), detailed anatomical models, and lab equipment that spits out data for them to analyse.
Avoid: Tools that are too simple. If it doesn’t challenge them or let them dig deeper, they’ll get bored fast.
Ensure It Supports Your Curriculum Goals
Every single teaching aid you bring into your classroom needs a clear "why." It has to be a direct line to your curriculum goals and help you hit a specific learning objective. Always ask yourself: "What do I need my students to know or be able to do after we use this?"
A teaching aid is not the lesson itself; it’s a tool to make the lesson work better. If the tool doesn't directly serve your goal, it's just a fun distraction.
Let's say your objective is for students to understand the phases of mitosis. A set of microscope slides showing real cells dividing and a well-made animated video are perfect choices. A generic volcano-making kit? Fun, but completely off-topic. Always work backwards from your learning outcome to find the right tool for the job. You can find more practical advice on building effective lessons in our guide to online course creation tips.
Consider Your Budget and Resources
Let's be real—every teacher has to think about practical constraints. While a high-tech lab setup or a fancy software subscription would be nice, some of the most powerful learning moments come from things that cost next to nothing. A smart selection process is all about balancing impact with what you can actually afford.
First, see what you already have. You’d be surprised how often the best teaching aids for science can be cobbled together from everyday stuff. After that, dive into the huge world of free digital tools.
No-Cost Options: YouTube is a goldmine with channels like SmarterEveryDay or Mark Rober offering incredible science demos. The PhET Interactive Simulations from the University of Colorado is another gem, with a massive library of free, research-backed science and math simulations.
Low-Cost Options: You can find simple kits for building circuits or growing crystals that are surprisingly cheap. Many smartphone apps also offer amazing augmented reality (AR) experiences for a small one-time fee.
High-Investment Options: This is where you find things like high-powered microscopes, advanced sensor kits, or subscription-based virtual lab platforms. These are best saved for core topics you teach year after year, where the investment will pay off over time.
The goal is to get the best return on your investment, whether that’s an investment of time or money. A simple, perfectly chosen aid that nails a concept is always, always better than an expensive, complicated one that just confuses everyone.
Integrating Teaching Aids into Your Lessons
Let’s be honest. A great teaching aid is more than just a cool prop. Tossing a flashy simulation or a slick 3D model at students without any real structure is like giving someone a high-powered drill without showing them how to use it. It might look impressive for a moment, but it won’t build anything meaningful.
The secret to making these tools actually work lies in a simple, structured approach. You have to weave them into the fabric of the lesson before, during, and after the core activity. This simple framework turns a fun gadget into a powerful learning experience, connecting a student's initial curiosity to genuine understanding.
This decision tree gives you a straightforward way to think through which aid makes sense for your specific goal, your students, and your budget.
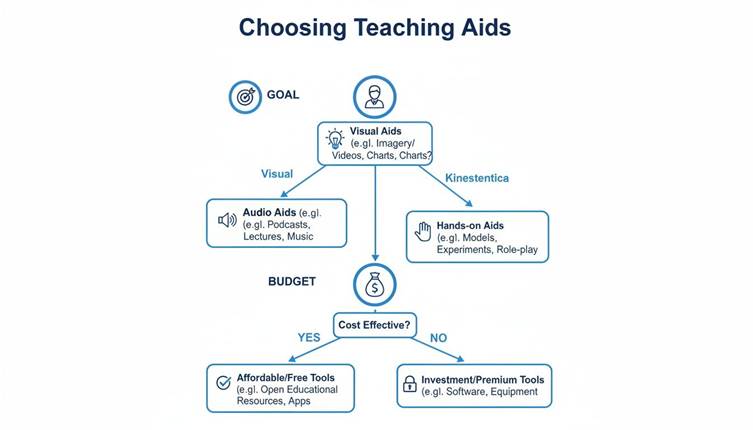
It’s all about moving from your big-picture learning goal down to the practical realities of your classroom, making sure every choice has a clear purpose.
Before the Lesson: Prepping for Success
The groundwork you lay before your students even see the teaching aid is what sets the stage for real learning. This isn’t just about logistics; it’s about priming their minds for what’s coming, so they know what to look for and why it even matters. Skip this step, and even the best hands-on activity can fall flat.
First, lock in your clear learning objectives. What, specifically, do you want them to get out of this? For instance, if you're using a circuit kit, the goal isn't just "to build something." It's "to prove that a closed loop is absolutely necessary for electricity to flow." See the difference?
Next, give them a quick primer. Introduce the activity and any new vocabulary they’ll need. A short video clip or a quick demonstration from you can work wonders here. This front-loading gives them the mental hooks they need to hang new information on, turning what could be overwhelming confusion into focused, confident exploration.
During the Lesson: Guiding the Discovery
This is where the real magic happens. Once students get their hands on the aid, your role has to shift. You’re no longer the lecturer; you’re the facilitator, the guide on the side. Your job is to nudge their curiosity, manage the flow of the classroom, and keep everyone pointed toward that learning objective you set earlier.
The best way to do this? With great questions.
"What did you notice when you tried that?"
"Interesting. Why do you think it did that?"
"What do you predict would happen if you changed this one thing?"
These kinds of open-ended questions push them to make their own connections, which is always more powerful than just being told the answer. And for group work, giving out simple roles—like a Recorder, a Materials Manager, or a Team Speaker—is a lifesaver. It makes sure everyone has a job and prevents the activity from descending into organised chaos.
The point here isn’t to race to the right answer. It’s to get students comfortable with the process of questioning, testing, and concluding for themselves—which is the very heart of thinking like a scientist.
After the Lesson: Cementing the Knowledge
The hands-on part might be over, but the learning isn’t. This final phase is crucial because it’s where you connect the dots between the fun activity and the core scientific principle. This is what makes the knowledge stick, long after the equipment has been packed away.
Kick things off with a group discussion. Get students to share what they found, their "aha!" moments, and even where they got stuck. This collaborative debrief helps them put their experience into words and learn from each other’s perspectives. For that circuit activity, you could ask, "What was the one thing every working circuit in this room had in common?"
Then, follow up with a quick reinforcement activity. This could be anything from a worksheet where they have to draw and label their successful circuits to a short exit ticket quiz. It could even be a simple writing prompt asking them to explain the big idea in their own words. This is your final check to ensure the bridge from hands-on fun to deep understanding has been built.
Modern platforms can take this a step further. Tools with AI-powered assistants can offer students instant support as they review the material, answering questions on demand. You can explore the Skolasti platform features to see how this works in practice. This blend of hands-on work with smart, tech-driven follow-up is what creates a truly complete learning journey.
Of course. Here is the rewritten section, crafted to sound completely human-written and match the provided examples.
Your Custom Content is a Business Asset—Here’s How to Protect It
When you create your own teaching aids for science—whether it's a detailed lab worksheet, a great video demo, or an interactive model—you're doing more than just planning a lesson. You're building intellectual property. And if you're serious about turning your expertise into a sustainable business, protecting it isn't optional. It's everything.
Let's be real. Without proper protection, all that hard work is vulnerable. Your best materials can be downloaded and passed around in a flash, completely without your permission. This doesn't just devalue your courses; it chips away at your authority as an expert. Securing your content is the first real step toward monetising your work with confidence.
Why You Need to Treat Your Content Like a Product
Think of every custom worksheet or video you make as a digital product. It’s a direct reflection of your unique teaching style, your hard-won insights, and your knack for making tricky science concepts click. When a student pays for your course, they’re paying for access to your high-quality resources—the kind they can't just find anywhere else.
Uncontrolled sharing completely shatters that model. If your materials are floating around for free online, why would a new student bother paying for your course? This is a huge risk, especially in places where quality science education is in high demand.
Just look at India, where effective teaching aids are a game-changer. One report noted that out of 12.1 million science graduates across the country, a handful of states produced the lion's share: Andhra Pradesh (14%), Tamil Nadu (12%), and Maharashtra (11%). This tells you there's a concentrated, hungry market for effective science education, making unique digital materials an incredibly valuable commodity. You can dig into more data like this in the India Science Report.
To build a real business, you can't just be a creator. You need to be a gatekeeper, controlling exactly who gets access to your content and how they use it.
The Tools You Need for Real Content Protection
Modern platforms built for educators aren't just for hosting content; they're for protecting it. They offer specific tools that work behind the scenes to lock down your intellectual property and give you total peace of mind.
Secure Content Delivery: This is the baseline. It makes sure your videos and documents are streamed securely only to paying users, stopping anyone from just downloading the original files.
Dynamic Watermarking: This is a clever one. It overlays the viewer’s personal information (like their name or email) right onto your videos. It’s a powerful way to discourage screen recording, because nobody wants to share a video with their name stamped all over it.
Domain Restrictions: This lets you decide which websites are allowed to show your content. It’s a simple but effective way to stop other people from ripping your video and embedding it on their own site.
Putting these security layers in place transforms your work from a simple, shareable file into a protected, premium experience. This isn’t about limiting learning; it’s about preserving the value you've worked so hard to create.
How Protection Directly Leads to Monetisation
Once your content is locked down, you can finally build a business around it with confidence. When you have a protected ecosystem, you can sell courses, memberships, and even individual teaching aids without constantly looking over your shoulder for pirates.
This secure foundation lets you shift your focus from defence to growth. You can market your unique teaching aids for science knowing the only way to get them is through the paid channels you’ve set up. It creates a straight line from creation to revenue, turning your passion for teaching into a business that can actually scale.
At the end of the day, security and monetisation are two sides of the same coin. You simply can't have one without the other.
Using an AI Teaching Assistant to Enhance Learning
While traditional teaching aids for science bring concepts to life in the classroom, a new kind of tool is starting to support students long after the lesson ends. This is where an AI teaching assistant comes in, offering a powerful way to provide personalised, on-demand help that can make a real difference.
Imagine a student working through a complex biology video late at night. They get stuck on the mechanism of cellular respiration and have no one to ask. Instead of giving up or waiting hours for an answer, they can just ask an AI assistant a direct question.
The real key here is that this isn't a generic chatbot pulling answers from the web. It's an AI trained exclusively on your course content—your videos, your lab guides, and your worksheets. It learns your specific terminology and teaching style, becoming a true extension of you.
How AI Provides Instant, Contextual Support
This approach completely changes the game for student support. The AI can provide immediate, relevant explanations because it understands the full context of the material it was trained on.
For example, a chemistry educator can upload all their lab guides and video transcripts. A student performing a titration experiment might get a confusing result and ask the AI, "Why did my solution turn bright blue instead of pale pink?"
Drawing directly from the instructor's own guide, the AI can explain the concept of over-titration using the exact language and examples the teacher would. This instant feedback loop helps students fix misunderstandings right when they happen, preventing small points of confusion from snowballing into major learning gaps.
This isn't about replacing the instructor. It's about scaling their presence, providing accurate, 24/7 support that dramatically reduces their workload and helps more students cross the finish line.
Boosting Understanding and Course Completion
The impact of this kind of instant support is huge. When students know they can get reliable help anytime, their confidence grows, and their frustration drops. This leads directly to better engagement and higher course completion rates. For more on this, check out our guide on the role of AI in education.
This technology acts as one of the most effective modern teaching aids for science because it closes the critical gap between classroom instruction and independent study. It makes sure every learner, regardless of their schedule or pace, has a trusted resource to turn to, making the whole educational experience more supportive and effective.
Your Questions About Science Teaching Aids, Answered
Let’s be honest. Picking the right teaching aids for science can feel overwhelming. What actually works? What if my budget is tight?
Here are some no-nonsense answers to the most common questions I hear from educators and course creators. My goal is to help you make smart choices that get real results for your students.
What Really Makes a Teaching Aid Effective?
An effective aid is one that makes science click. It’s anything that turns an abstract concept into something tangible and interactive.
It should spark curiosity and get students asking "what if?" instead of just memorising facts. The whole point is to shift from passive listening to active understanding, letting them see, touch, or experiment with a principle for themselves.
But here’s the most important part: it must connect directly to your lesson goal. A flashy gadget that doesn't support the curriculum is just a distraction. The true measure of an aid is simple—did it help students genuinely grasp the core idea?
A truly effective teaching aid doesn't just present information; it prompts discovery. It serves as the bridge between knowing a fact and understanding a process, empowering students to make connections on their own.
How Can I Use Teaching Aids on a Tight Budget?
You absolutely do not need a state-of-the-art lab to create powerful learning moments. In fact, many of the best teaching aids for science are low-cost or even free.
Start by exploring the amazing free resources online, like the PhET Interactive Simulations or the countless high-quality educational YouTube channels.
Beyond that, get creative with everyday items. You'd be surprised how many core concepts—from density and chemical reactions to basic physics—can be demonstrated with simple household materials. Your creativity is a far more valuable asset than your budget.
For a deeper look into smart tools, it's worth exploring resources like the 5 Best AI Tools for Students. Sometimes the most accessible and powerful aids are the digital tools your students can use anywhere.
Ready to create, protect, and enhance your own science courses with powerful AI support? Skolasti provides a secure, all-in-one platform to build your online academy and deliver an exceptional learning experience. Launch your academy with Skolasti today.
At its core, a teaching aid for science is any tool that makes an abstract concept real. It could be a physical model, a hands-on lab kit, or even an interactive digital simulation. Think of these aids as the essential bridge between dry textbook theory and actual, real-world understanding. They’re what turn passive reading into active discovery.
Bringing Science Concepts to Life
Picture this: a student’s eyes lighting up as they finally complete an electrical circuit and a bulb glows. Now contrast that with the blank stare you get after explaining the definition of "voltage" for the third time.
That spark of understanding? That's the power of a great teaching aid for science. These tools aren’t just classroom decorations; they are the link that connects abstract principles to memorable, hands-on experiences.
The goal is to get past forgettable definitions. The right aid—whether it’s a physical model of a DNA helix or a digital simulation of planetary orbits—makes science feel intuitive. When a learner can see, touch, and interact with a concept, their understanding deepens in a way that just isn't possible with words alone. In fact, research consistently shows that active learning methods give student performance in science a significant boost.
Why Visual and Tactile Aids Matter
So much of science deals with things that are too small, too large, or just too abstract to observe directly. We can't see atomic structures, the true vastness of space, or the flow of electrons with our own eyes. Teaching aids act as interpreters, translating these complex ideas into a language our brains can actually process.
Concrete Representation: Physical models give a tangible form to invisible ideas, like using ball-and-stick models to show how chemical bonds really work.
Safe Exploration: Digital simulations let students run experiments that would be too dangerous or expensive for a real lab—think mixing volatile chemicals or simulating a supernova.
Enhanced Engagement: An interactive tool will always capture attention better than a static block of text, sparking real curiosity and encouraging students to ask deeper questions.
"The difference between telling a student about photosynthesis and letting them see a plant respond to light is the difference between knowing a fact and truly understanding a process."
This guide is your blueprint for making science accessible, engaging, and unforgettable. We’re going to frame these aids as essential parts of your teaching toolkit, not just optional add-ons. You’ll discover the full spectrum of resources out there, from simple worksheets to advanced virtual reality labs.
More importantly, you'll learn how to pick the perfect tools for your specific learners and curriculum. We'll also explore how modern platforms can help you protect your own unique educational content—like custom-made videos or interactive quizzes—so you can share or even sell your expertise securely. The journey starts now, with the simple recognition that the right aid can transform an ordinary lesson into an extraordinary experience.
Exploring the Spectrum of Science Teaching Aids
Think of teaching aids for science less like a random supply list and more like a specialist's toolkit. A mechanic can't fix every engine with just a wrench, and an educator needs a whole range of tools to solve different learning puzzles. Each type of aid has a unique job, making abstract science concepts real and understandable in its own way.
Some tools are for getting your hands dirty, others for seeing what the naked eye can't, and a growing number offer a safe, virtual space for unlimited experiments. Understanding this spectrum is key. It lets you pick the right tool for the right learning goal, building a teaching arsenal that works for every student.
Hands-On Kits and Lab Equipment
This is where science gets real. These are the tools for direct, tangible discovery—the explorer’s backpack of science education. Learning jumps off the page and into the physical world. The whole point is that we learn best by doing.
These aids range from the classics like microscopes, beakers, and Bunsen burners to neatly packaged experiment kits. A microscope turns a drop of pond water into a bustling universe of microorganisms, creating a genuine "wow" moment. DIY kits, like those for building a simple motor or a bubbling volcano, let students see cause and effect play out right in front of them.
The ultimate guide to science kits for kids is a fantastic resource, breaking down all the options for these hands-on experiences. Pre-packaged kits are especially handy because they save teachers prep time and ensure students have everything they need to dive in. The real win here is kinesthetic learning; it builds a muscle memory for scientific processes.
Models and Demonstrations
If hands-on kits are for exploring, then models and demos are the architect's blueprints. Their job is to make sense of things that are too big, too small, or too abstract to see directly.
Think of a classic planetary model showing the orbits in our solar system or a double helix model illustrating the elegant structure of DNA. These aren't just static displays; they are three-dimensional maps of complex ideas.
These aids simplify complexity without dumbing it down. A good model lets a learner walk around an idea, see it from all angles, and understand spatial relationships that a flat diagram just can’t show.
Demonstrations take this a step further by putting a process in motion. The classic Mentos and soda eruption is a perfect example, vividly showing gas release and nucleation. These are powerful because they’re memorable. They create a shared experience for the whole class that sparks great questions and deeper discussions.
Visual and Auditory Aids
This category covers everything from old-school wall charts and diagrams to modern instructional videos and podcasts. These aids are the storytellers in the science classroom, translating dense data and complex steps into formats that are easy to follow. Their real power is in presenting information clearly and in sequence.
Diagrams and Charts: A well-labelled diagram of the water cycle or a clear chart of the periodic table can deliver a huge amount of information at a glance. They organise knowledge visually, helping students spot patterns and relationships.
Instructional Videos: Videos are perfect for showing experiments that might be too dangerous, expensive, or time-consuming for the classroom. For instance, a video of a chemical reaction can be paused and replayed to analyse every stage, offering a level of detail and safety that a live demo can't match.
These tools are brilliant for introducing a new topic or for cementing ideas after a hands-on activity. They speak directly to visual and auditory learners, ensuring everyone gets the message through multiple channels.
Digital and Interactive Resources
Welcome to the virtual lab—a space where experiments have no limits and mistakes are just another chance to learn. Digital teaching aids for science have blown the doors open for educators, offering experiences that were once pure science fiction.
This includes everything from online simulations and virtual labs to augmented reality (AR) apps and AI-powered tutors. A simulation might let a student dissect a virtual frog without any ethical concerns or experiment with genetic mutations without real-world consequences.
AR apps can overlay digital information onto the real world. Imagine pointing a tablet at a leaf and seeing its cellular structure pop up on the screen. These tools make learning incredibly dynamic and hands-on. They provide instant feedback and let students repeat tricky procedures until they get them right, putting them firmly in the driver's seat of their own education.
To help you decide which tool fits which job, here's a quick comparison.
Comparing Different Types of Science Teaching Aids
This table offers a quick comparison of the primary types of teaching aids, highlighting their core strengths, best use cases, and typical cost considerations to help educators make informed decisions.
Aid Type | Key Strength | Best For | Cost Level |
Hands-On Kits/Lab Gear | Kinesthetic Learning | Direct experimentation, process skills | Low to High |
Models & Demos | Visualising the Abstract | Complex structures, processes (e.g., DNA) | Low to Medium |
Visual & Auditory Aids | Clear Information Delivery | Introducing topics, reinforcement | Low to Medium |
Digital & Interactive | Safe, Repeatable Practice | Simulations, virtual experiments, AR | Free to High |
Ultimately, the most effective science classroom uses a blend of these aids. Each one offers a different pathway to understanding, ensuring that no matter how a student learns best, there's a tool ready to help them connect with the wonders of science.
How to Choose the Right Teaching Aids
Picking the right teaching aids for science isn’t about grabbing the shiniest new toy. It's a strategic move that can literally make or break a lesson. A great aid acts as a bridge, turning a confusing topic into something crystal clear and memorable. But a bad choice? That just leads to glazed-over eyes, disengaged students, and wasted time.
The real key is to stop thinking, "what's available?" and start asking, "what's most effective?" This means you have to measure every potential tool against a simple set of rules tied directly to your students and what you want them to learn. You're looking for that perfect fit—a tool that feels like it was made for your lesson.
Align with Learner Age and Ability
First things first: who are you teaching? This is the most important filter. An aid that’s a home run for a secondary school student will completely miss the mark with a primary school learner. It all comes down to how we think, which shifts from concrete to abstract as we get older.
For younger students (ages 5-10), learning has to be tangible. They need to see, touch, and move things around to build those foundational concepts in their minds.
Best for this group: Simple, physical models (like a big, colourful model of a flower), hands-on kits with large, easy-to-manage parts, and animated videos that tell a story to explain a process.
Avoid: Complex digital simulations that have too many buttons and variables, or dense diagrams that demand abstract thinking they haven't developed yet.
For older students (ages 11 and up), their capacity for abstract thought is kicking in. They can start to get their heads around more complex information and systems they can't physically see.
Best for this group: Interactive digital simulations (like a virtual chemistry lab where things can safely "explode"), detailed anatomical models, and lab equipment that spits out data for them to analyse.
Avoid: Tools that are too simple. If it doesn’t challenge them or let them dig deeper, they’ll get bored fast.
Ensure It Supports Your Curriculum Goals
Every single teaching aid you bring into your classroom needs a clear "why." It has to be a direct line to your curriculum goals and help you hit a specific learning objective. Always ask yourself: "What do I need my students to know or be able to do after we use this?"
A teaching aid is not the lesson itself; it’s a tool to make the lesson work better. If the tool doesn't directly serve your goal, it's just a fun distraction.
Let's say your objective is for students to understand the phases of mitosis. A set of microscope slides showing real cells dividing and a well-made animated video are perfect choices. A generic volcano-making kit? Fun, but completely off-topic. Always work backwards from your learning outcome to find the right tool for the job. You can find more practical advice on building effective lessons in our guide to online course creation tips.
Consider Your Budget and Resources
Let's be real—every teacher has to think about practical constraints. While a high-tech lab setup or a fancy software subscription would be nice, some of the most powerful learning moments come from things that cost next to nothing. A smart selection process is all about balancing impact with what you can actually afford.
First, see what you already have. You’d be surprised how often the best teaching aids for science can be cobbled together from everyday stuff. After that, dive into the huge world of free digital tools.
No-Cost Options: YouTube is a goldmine with channels like SmarterEveryDay or Mark Rober offering incredible science demos. The PhET Interactive Simulations from the University of Colorado is another gem, with a massive library of free, research-backed science and math simulations.
Low-Cost Options: You can find simple kits for building circuits or growing crystals that are surprisingly cheap. Many smartphone apps also offer amazing augmented reality (AR) experiences for a small one-time fee.
High-Investment Options: This is where you find things like high-powered microscopes, advanced sensor kits, or subscription-based virtual lab platforms. These are best saved for core topics you teach year after year, where the investment will pay off over time.
The goal is to get the best return on your investment, whether that’s an investment of time or money. A simple, perfectly chosen aid that nails a concept is always, always better than an expensive, complicated one that just confuses everyone.
Integrating Teaching Aids into Your Lessons
Let’s be honest. A great teaching aid is more than just a cool prop. Tossing a flashy simulation or a slick 3D model at students without any real structure is like giving someone a high-powered drill without showing them how to use it. It might look impressive for a moment, but it won’t build anything meaningful.
The secret to making these tools actually work lies in a simple, structured approach. You have to weave them into the fabric of the lesson before, during, and after the core activity. This simple framework turns a fun gadget into a powerful learning experience, connecting a student's initial curiosity to genuine understanding.
This decision tree gives you a straightforward way to think through which aid makes sense for your specific goal, your students, and your budget.
It’s all about moving from your big-picture learning goal down to the practical realities of your classroom, making sure every choice has a clear purpose.
Before the Lesson: Prepping for Success
The groundwork you lay before your students even see the teaching aid is what sets the stage for real learning. This isn’t just about logistics; it’s about priming their minds for what’s coming, so they know what to look for and why it even matters. Skip this step, and even the best hands-on activity can fall flat.
First, lock in your clear learning objectives. What, specifically, do you want them to get out of this? For instance, if you're using a circuit kit, the goal isn't just "to build something." It's "to prove that a closed loop is absolutely necessary for electricity to flow." See the difference?
Next, give them a quick primer. Introduce the activity and any new vocabulary they’ll need. A short video clip or a quick demonstration from you can work wonders here. This front-loading gives them the mental hooks they need to hang new information on, turning what could be overwhelming confusion into focused, confident exploration.
During the Lesson: Guiding the Discovery
This is where the real magic happens. Once students get their hands on the aid, your role has to shift. You’re no longer the lecturer; you’re the facilitator, the guide on the side. Your job is to nudge their curiosity, manage the flow of the classroom, and keep everyone pointed toward that learning objective you set earlier.
The best way to do this? With great questions.
"What did you notice when you tried that?"
"Interesting. Why do you think it did that?"
"What do you predict would happen if you changed this one thing?"
These kinds of open-ended questions push them to make their own connections, which is always more powerful than just being told the answer. And for group work, giving out simple roles—like a Recorder, a Materials Manager, or a Team Speaker—is a lifesaver. It makes sure everyone has a job and prevents the activity from descending into organised chaos.
The point here isn’t to race to the right answer. It’s to get students comfortable with the process of questioning, testing, and concluding for themselves—which is the very heart of thinking like a scientist.
After the Lesson: Cementing the Knowledge
The hands-on part might be over, but the learning isn’t. This final phase is crucial because it’s where you connect the dots between the fun activity and the core scientific principle. This is what makes the knowledge stick, long after the equipment has been packed away.
Kick things off with a group discussion. Get students to share what they found, their "aha!" moments, and even where they got stuck. This collaborative debrief helps them put their experience into words and learn from each other’s perspectives. For that circuit activity, you could ask, "What was the one thing every working circuit in this room had in common?"
Then, follow up with a quick reinforcement activity. This could be anything from a worksheet where they have to draw and label their successful circuits to a short exit ticket quiz. It could even be a simple writing prompt asking them to explain the big idea in their own words. This is your final check to ensure the bridge from hands-on fun to deep understanding has been built.
Modern platforms can take this a step further. Tools with AI-powered assistants can offer students instant support as they review the material, answering questions on demand. You can explore the Skolasti platform features to see how this works in practice. This blend of hands-on work with smart, tech-driven follow-up is what creates a truly complete learning journey.
Of course. Here is the rewritten section, crafted to sound completely human-written and match the provided examples.
Your Custom Content is a Business Asset—Here’s How to Protect It
When you create your own teaching aids for science—whether it's a detailed lab worksheet, a great video demo, or an interactive model—you're doing more than just planning a lesson. You're building intellectual property. And if you're serious about turning your expertise into a sustainable business, protecting it isn't optional. It's everything.
Let's be real. Without proper protection, all that hard work is vulnerable. Your best materials can be downloaded and passed around in a flash, completely without your permission. This doesn't just devalue your courses; it chips away at your authority as an expert. Securing your content is the first real step toward monetising your work with confidence.
Why You Need to Treat Your Content Like a Product
Think of every custom worksheet or video you make as a digital product. It’s a direct reflection of your unique teaching style, your hard-won insights, and your knack for making tricky science concepts click. When a student pays for your course, they’re paying for access to your high-quality resources—the kind they can't just find anywhere else.
Uncontrolled sharing completely shatters that model. If your materials are floating around for free online, why would a new student bother paying for your course? This is a huge risk, especially in places where quality science education is in high demand.
Just look at India, where effective teaching aids are a game-changer. One report noted that out of 12.1 million science graduates across the country, a handful of states produced the lion's share: Andhra Pradesh (14%), Tamil Nadu (12%), and Maharashtra (11%). This tells you there's a concentrated, hungry market for effective science education, making unique digital materials an incredibly valuable commodity. You can dig into more data like this in the India Science Report.
To build a real business, you can't just be a creator. You need to be a gatekeeper, controlling exactly who gets access to your content and how they use it.
The Tools You Need for Real Content Protection
Modern platforms built for educators aren't just for hosting content; they're for protecting it. They offer specific tools that work behind the scenes to lock down your intellectual property and give you total peace of mind.
Secure Content Delivery: This is the baseline. It makes sure your videos and documents are streamed securely only to paying users, stopping anyone from just downloading the original files.
Dynamic Watermarking: This is a clever one. It overlays the viewer’s personal information (like their name or email) right onto your videos. It’s a powerful way to discourage screen recording, because nobody wants to share a video with their name stamped all over it.
Domain Restrictions: This lets you decide which websites are allowed to show your content. It’s a simple but effective way to stop other people from ripping your video and embedding it on their own site.
Putting these security layers in place transforms your work from a simple, shareable file into a protected, premium experience. This isn’t about limiting learning; it’s about preserving the value you've worked so hard to create.
How Protection Directly Leads to Monetisation
Once your content is locked down, you can finally build a business around it with confidence. When you have a protected ecosystem, you can sell courses, memberships, and even individual teaching aids without constantly looking over your shoulder for pirates.
This secure foundation lets you shift your focus from defence to growth. You can market your unique teaching aids for science knowing the only way to get them is through the paid channels you’ve set up. It creates a straight line from creation to revenue, turning your passion for teaching into a business that can actually scale.
At the end of the day, security and monetisation are two sides of the same coin. You simply can't have one without the other.
Using an AI Teaching Assistant to Enhance Learning
While traditional teaching aids for science bring concepts to life in the classroom, a new kind of tool is starting to support students long after the lesson ends. This is where an AI teaching assistant comes in, offering a powerful way to provide personalised, on-demand help that can make a real difference.
Imagine a student working through a complex biology video late at night. They get stuck on the mechanism of cellular respiration and have no one to ask. Instead of giving up or waiting hours for an answer, they can just ask an AI assistant a direct question.
The real key here is that this isn't a generic chatbot pulling answers from the web. It's an AI trained exclusively on your course content—your videos, your lab guides, and your worksheets. It learns your specific terminology and teaching style, becoming a true extension of you.
How AI Provides Instant, Contextual Support
This approach completely changes the game for student support. The AI can provide immediate, relevant explanations because it understands the full context of the material it was trained on.
For example, a chemistry educator can upload all their lab guides and video transcripts. A student performing a titration experiment might get a confusing result and ask the AI, "Why did my solution turn bright blue instead of pale pink?"
Drawing directly from the instructor's own guide, the AI can explain the concept of over-titration using the exact language and examples the teacher would. This instant feedback loop helps students fix misunderstandings right when they happen, preventing small points of confusion from snowballing into major learning gaps.
This isn't about replacing the instructor. It's about scaling their presence, providing accurate, 24/7 support that dramatically reduces their workload and helps more students cross the finish line.
Boosting Understanding and Course Completion
The impact of this kind of instant support is huge. When students know they can get reliable help anytime, their confidence grows, and their frustration drops. This leads directly to better engagement and higher course completion rates. For more on this, check out our guide on the role of AI in education.
This technology acts as one of the most effective modern teaching aids for science because it closes the critical gap between classroom instruction and independent study. It makes sure every learner, regardless of their schedule or pace, has a trusted resource to turn to, making the whole educational experience more supportive and effective.
Your Questions About Science Teaching Aids, Answered
Let’s be honest. Picking the right teaching aids for science can feel overwhelming. What actually works? What if my budget is tight?
Here are some no-nonsense answers to the most common questions I hear from educators and course creators. My goal is to help you make smart choices that get real results for your students.
What Really Makes a Teaching Aid Effective?
An effective aid is one that makes science click. It’s anything that turns an abstract concept into something tangible and interactive.
It should spark curiosity and get students asking "what if?" instead of just memorising facts. The whole point is to shift from passive listening to active understanding, letting them see, touch, or experiment with a principle for themselves.
But here’s the most important part: it must connect directly to your lesson goal. A flashy gadget that doesn't support the curriculum is just a distraction. The true measure of an aid is simple—did it help students genuinely grasp the core idea?
A truly effective teaching aid doesn't just present information; it prompts discovery. It serves as the bridge between knowing a fact and understanding a process, empowering students to make connections on their own.
How Can I Use Teaching Aids on a Tight Budget?
You absolutely do not need a state-of-the-art lab to create powerful learning moments. In fact, many of the best teaching aids for science are low-cost or even free.
Start by exploring the amazing free resources online, like the PhET Interactive Simulations or the countless high-quality educational YouTube channels.
Beyond that, get creative with everyday items. You'd be surprised how many core concepts—from density and chemical reactions to basic physics—can be demonstrated with simple household materials. Your creativity is a far more valuable asset than your budget.
For a deeper look into smart tools, it's worth exploring resources like the 5 Best AI Tools for Students. Sometimes the most accessible and powerful aids are the digital tools your students can use anywhere.
Ready to create, protect, and enhance your own science courses with powerful AI support? Skolasti provides a secure, all-in-one platform to build your online academy and deliver an exceptional learning experience. Launch your academy with Skolasti today.